How to Match Face Painting Designs to Party Themes

Face painting is a fun and creative way to keep kids entertained during events. It adds color, excitement, and imagination to parties of all kinds. Matching face painting designs to party themes helps create a unified and memorable experience. When designs connect with the theme, children feel more involved, and the event looks well planned.

This guide explains how to match face painting designs with party themes in a clear, simple way. You will learn how to plan designs, choose colors, and create a smooth experience for both kids and event organizers.

Understanding the Importance of Themed Face Painting

Face painting works best when it matches the event theme. A strong match builds excitement and helps kids connect with the party’s atmosphere. Whether it is a birthday, school fair, or holiday event, matching designs to themes shows attention to detail and creates lasting memories.

When you align designs with the theme, kids can become part of the story. For example, at a superhero party, face paint can transform them into their favorite heroes. At a princess event, sparkly crowns and glitter makeup make every child feel royal. The closer the design fits the theme, the more engaging the experience becomes.

Planning Face Painting for Events

Good planning helps ensure that face painting fits smoothly into any event. Start by identifying the main theme. Once you know it, list possible designs that match. Consider the number of kids attending, the time available, and the skill level of the face painter.

A clear plan helps prevent delays and keeps kids entertained without long waiting times. For large events, having multiple painters or quick design options is a smart choice. Keep hygiene in mind by using clean brushes and sponges for each child. Visit this website to learn more about face painting and how it can add color and fun to your event.

Choosing the Right Face Painting Designs

Selecting designs that match the theme is the core step. Think of what symbols, colors, or characters represent that theme. Here are examples of how to match designs with popular party themes.

Superhero Parties

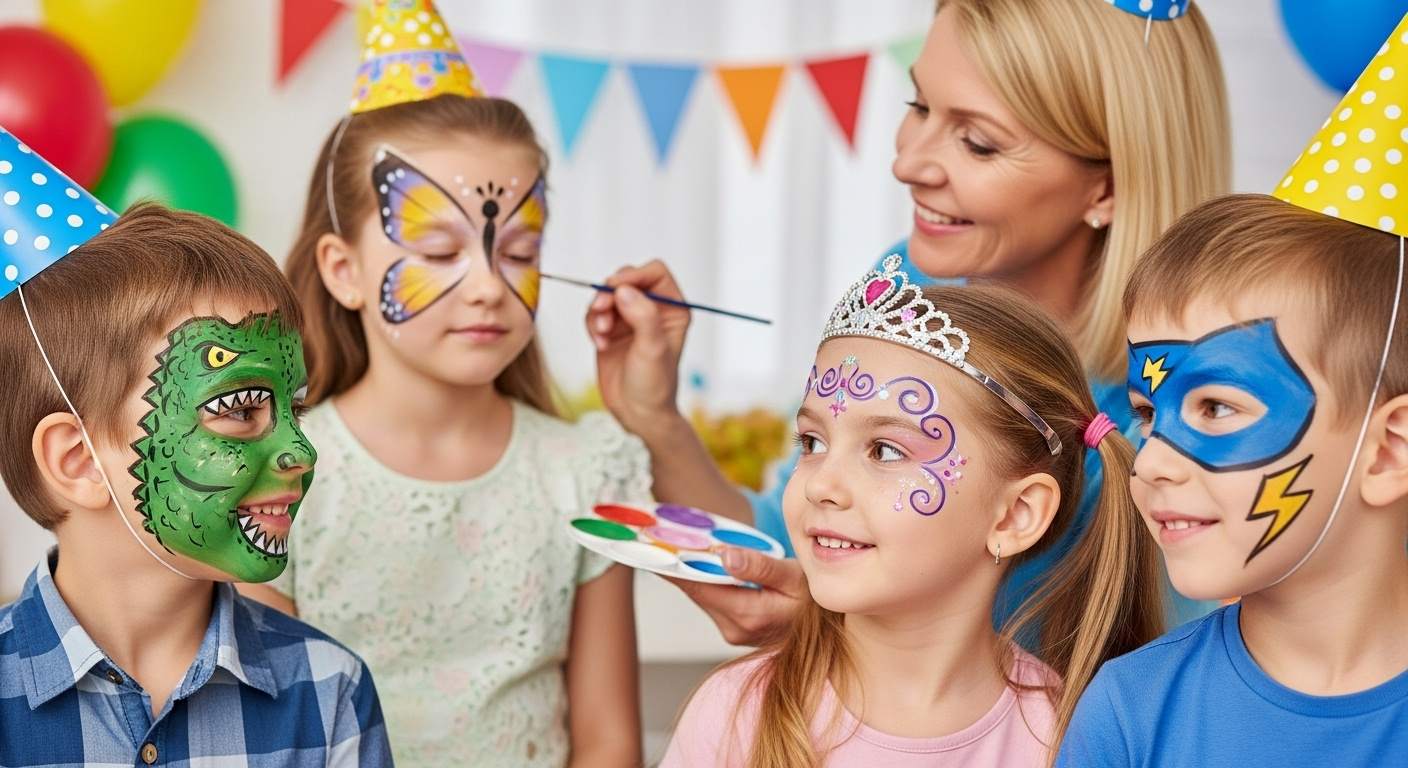
Superhero themes are a favorite at many kids’ events. Paint designs inspired by famous heroes such as masks, lightning bolts, or team symbols. Use bright colors like red, blue, and yellow to reflect the comic-book look. Kids love to recognize characters, so simple designs like spider webs, stars, or shields work well.

Animal or Jungle Parties

Animal themes allow creativity and variety. Tigers, butterflies, lions, and zebras are common choices. For a jungle event, green, brown, and yellow shades fit best. Use soft lines for younger children and bolder patterns for older ones. Adding small glitter or whisker details can make designs more fun.

Princess and Fairy Parties

Princess themes often include crowns, tiaras, flowers, and sparkles. Use pastel tones like pink, lavender, and silver. Fairies can include wings or light glitter dust to match the magical tone. These soft and colorful designs help kids feel special and part of a fantasy world.

Pirate Parties

Pirate themes work well with black, red, and white paint. Designs can include eye patches, skulls, or simple beards. Small anchor or treasure chest symbols also fit well. Boys and girls enjoy pirate looks because they can feel adventurous and bold.

Sports Parties

For sports-themed events, paint simple designs based on team colors or sports gear. Baseballs, footballs, or basketballs make good quick options. Kids who love competition enjoy showing off their team spirit through their face paint.

Seasonal or Holiday Parties

Seasonal events can inspire many ideas. For Halloween, choose pumpkins, bats, or spider webs. For Christmas, snowflakes, reindeer, and candy canes work well. During spring festivals, flowers and butterflies add cheerful detail. Adjust colors based on the holiday mood to make each design fit naturally.

Matching Colors to the Party Theme

Color choice has a strong effect on how designs match themes. Stick to a color palette that reflects the party setup. If decorations are mostly red and yellow, make sure face paint uses similar shades. This helps create harmony across the event.

For calm or soft themes like fairies or mermaids, choose pastels such as light blue, lavender, and pink. For bold themes like superheroes or pirates, use darker and brighter tones. Consistent color coordination connects every element and gives the event a complete look.

Keeping Kids Entertained During Face Painting

Kids love face painting, but long lines can make them restless. Keep them entertained while waiting by using music, games, or small crafts. The goal is to make the waiting time part of the fun, not a distraction.

You can also organize painting stations by theme. For example, one station for superheroes, another for animals, and another for princesses. This approach speeds up the process and gives children a choice without confusion.

Face painters should also be friendly and patient. Talking to each child helps them relax and adds to the excitement. Kids remember these small interactions long after the event ends.

Coordinating with Event Organizers

Good communication between face painters and event planners ensures a smooth setup. Discuss space requirements, lighting, and time slots before the event begins. A well-lit, accessible area helps painters work faster and keeps designs neat.

Provide chairs and a small table for supplies. Having wipes, mirrors, and water nearby saves time. Make sure parents know the materials are safe and skin-friendly. Sharing safety information builds trust and helps kids enjoy the activity with confidence.

Promoting Face Painting as a Highlight

At many events, face painting is more than a side activity—it can be a central attraction. Promote it in invitations and announcements to build excitement. Use photos of past designs so parents and kids know what to expect.

Encourage parents to take pictures and share them online. This not only creates memories but also helps promote future events. Organizers can even hold a small photo contest for the best face paint design. This keeps guests engaged and adds energy to the celebration.

Simplifying Designs for Faster Events

For large gatherings, it helps to offer quick, simple designs. Kids are happy with small but neat art like hearts, stars, or mini butterflies. Limiting the color palette and focusing on clear shapes reduces time per child without lowering quality.

Have a design chart displayed so kids can pick their favorite quickly. Visual options prevent confusion and keep the line moving. This method ensures every child gets painted and stays entertained throughout the event.

Safety and Hygiene Practices

Safety is important for every face painting activity. Always use paints made for skin. Avoid acrylic or craft paints, as they can cause irritation. Clean brushes after each use and change sponges often.

Ask parents about any allergies before painting. If a child has sensitive skin, test a small area first. Use hand sanitizer before and after each session to maintain hygiene. Keeping materials clean and organized protects both kids and painters.

Evaluating the Event Experience

After the event, review how the face painting went. Ask organizers and parents for feedback. This helps improve future events. Track which designs were most popular and which took too long to complete.

By reviewing each event, painters and organizers can refine their approach. The goal is to make future experiences smoother and more enjoyable. A short checklist after each event helps keep quality consistent.

Conclusion

Face painting is a powerful way to keep kids entertained at parties and events. Matching designs to party themes creates connection, excitement, and unity. From superheroes to fairies, every theme offers chances to make kids smile.

With good planning, clear designs, safe materials, and proper coordination, face painting can become the highlight of any celebration. When colors, ideas, and creativity align with the event theme, the result is a fun, engaging, and memorable experience for everyone.

How to Achieve Financial Independence and Retire Early

Achieving financial independence and retiring early is a goal many people share. It requires clear planning, discipline, and consistent action. This guide explains how to reach financial independence by understanding money, building Business Wealth, and working with a finance consultant for better results.

Understanding Financial Independence

Financial independence means having enough income or assets to cover your living expenses without needing a job. When you reach this point, your investments, savings, and passive income provide financial security and freedom.

To achieve this, you need to manage your money with purpose. Every dollar you earn should support your long-term financial goals. You must understand your income, expenses, debts, and investments. This awareness helps you make better choices that lead to wealth and freedom.

The Importance of a Clear Goal

Financial independence starts with a goal. You need to know how much money you must save or invest to cover your desired lifestyle. This number is different for everyone. It depends on where you live, how much you spend, and how you want to live after retirement.

Write down your goal in simple terms. For example, “I want to save $1 million by age 50.” This gives you a clear target and helps you measure your progress.

How Business Wealth Supports Financial Independence

Building business wealth is one of the most powerful ways to achieve financial freedom. A well-structured business not only generates consistent income but also builds long-term equity that grows beyond the limits of a regular paycheck. With the right guidance, your business can become a strong financial engine that funds your personal and family goals. That’s where Mercer Wealth Management plays a key role—helping entrepreneurs, families, and small business owners make smarter financial decisions. By aligning your business strategy with sound wealth management principles, you can maximize profits, protect assets, and create sustainable financial growth that lasts for generations.

If you own a business, focus on profitability, cash flow, and sustainable expansion. Keep expenses under control and reinvest earnings into areas that support innovation and long-term success. Mercer Wealth Management emphasizes a personalized approach, ensuring every client’s financial strategy reflects their goals and risk tolerance. Even if you’re not a business owner, you can still grow your wealth through strategic investment, such as funding small businesses, online ventures, or diversified portfolios that match your financial plan. With the right structure and advice, your money can work harder for you, building a secure foundation for your future.

Building a Strong Financial Foundation

A solid financial base is essential for independence. This foundation includes budgeting, saving, and debt management. Without these habits, your progress may slow or stop.

Track Income and Expenses

Start by tracking where your money goes. Use a notebook or an app to record your income and expenses. This simple step helps you see spending patterns and find areas to save more.

Spend less than you earn. This is the most basic rule of wealth building. Every dollar saved increases your ability to invest and grow your assets.

Manage Debt Wisely

High-interest debt can stop you from achieving financial independence. Focus on paying off debts that cost the most first, such as credit cards or personal loans.

If possible, avoid new debt. Instead, build an emergency fund to cover unexpected expenses. This keeps you from using credit cards in emergencies.

Save and Invest Consistently

Saving is the foundation of financial growth, but investing is what multiplies your money. Start with a regular saving plan and invest a fixed amount every month.

Choose investments that match your goals and risk level. Common options include:

  • Stocks and mutual funds
  • Real estate
  • Retirement accounts like 401(k) or IRA
  • Business investments

Diversify your investments to reduce risk. A balanced portfolio supports long-term stability and protects your assets from market changes.

Working with a Finance Consultant

A finance consultant can guide you through planning, investing, and managing money more effectively. They can help you build strategies that fit your income, lifestyle, and retirement goals.

Benefits of Professional Guidance

A finance consultant helps you:

  • Create a personal plan for financial independence
  • Manage taxes efficiently
  • Choose the right investments
  • Avoid emotional decisions in volatile markets

Their experience helps you avoid mistakes that can cost time and money. They can also show you new ways to grow your Business Wealth safely.

How to Choose the Right Finance Consultant

Choose a consultant with proven experience and transparent fees. Ask about their qualifications, approach, and success stories. A good consultant explains financial concepts in clear, simple language.

Avoid anyone who promises guaranteed high returns. Real financial growth takes time and discipline, not quick schemes.

Creating Multiple Income Streams

Relying on one income source is risky. If that source fails, your financial independence plan can collapse. Building multiple income streams helps reduce that risk.

Passive Income Options

Passive income allows money to flow in without constant work. Some popular options include:

  • Rental properties
  • Dividends from stocks
  • Royalties from books, music, or digital content
  • Peer-to-peer lending
  • Affiliate marketing

Each income source should align with your goals and available time. Passive income helps you retire earlier by creating steady cash flow even when you stop working.

Active Income Strategies

Active income requires effort but can boost your progress. For example:

  • Freelancing or consulting
  • Running a small business
  • Online courses or digital products
  • Real estate management

Combining active and passive income builds stronger financial security and speeds up your path to independence.

Controlling Lifestyle Inflation

As income grows, many people start spending more. This behavior, called lifestyle inflation, slows financial progress. To avoid it, keep your expenses consistent even as your income rises.

Save or invest the extra income instead of upgrading your lifestyle. This discipline allows your savings and investments to grow faster.

You can still enjoy life without overspending. Budget for fun, but keep long-term goals as your top priority.

Planning for Retirement

Retirement planning ensures your money lasts throughout your life. It includes estimating expenses, managing healthcare, and maintaining income streams.

Calculate Your Retirement Needs

Estimate how much money you will need each year after retirement. Multiply that by the number of years you expect to live after retiring. Add a safety margin for healthcare and inflation.

This gives you a clear savings target. Your investments should generate enough income to meet this target without reducing your principal amount too quickly.

Manage Retirement Accounts

Maximize your contributions to retirement accounts like 401(k), IRA, or Roth IRA. These accounts offer tax benefits that speed up savings growth.

Rebalance your investments as you get closer to retirement. Move some funds to safer options like bonds or fixed-income investments to protect your assets.

Maintaining Financial Discipline

Financial independence depends on habits and mindset. Stay consistent, even during slow periods. Avoid comparing your progress with others.

Track your net worth every few months. Seeing steady improvement keeps you motivated and focused on your goal.

Stay informed about financial trends and updates, but make decisions based on logic, not emotion.

Conclusion

Achieving financial independence and retiring early is possible with clear goals, steady discipline, and smart money management. Build Business Wealth, manage debt, invest wisely, and work with a trusted finance consultant for better results.

Financial freedom gives you the power to live on your terms. The earlier you start, the sooner you can enjoy the benefits of independence and security.

What Information Helps Find a Missing Loved One?

Finding a missing loved one is a serious matter that needs clear information and immediate action. The process depends on sharing accurate details and working with professionals who understand how to run a proper investigation. Whether through public services or a private investigation, having the right facts is the first step toward finding someone safely and quickly.

Basic Information That Supports the Search

Full Name and Nicknames

Share the full legal name of the missing person. Also mention any nicknames, aliases, or shortened versions they use. This helps ensure the person can be identified across different records and databases.

Date of Birth and Age

Providing the date of birth helps match the individual with government or hospital records. If the exact date is unknown, give an estimated age. This can still help narrow down search results.

Physical Description

Include height, weight, hair color, eye color, and any marks like tattoos, scars, or birthmarks. If there have been any recent changes in appearance, mention them too. This allows others to recognize the person more easily.

Clothing Last Worn

Mention what the person was last seen wearing. Include colors, brand names, or anything unusual about the outfit. Small details may help someone recall seeing them.

Last Known Location

State exactly where the person was last seen. Give the address, city, and nearby landmarks if available. This helps define the starting point for any search or investigation.

Time and Date of Disappearance

Time and date details of a disappearance play a crucial role in any missing person investigation. Recording the exact time or the closest possible estimate helps establish a clear timeline, allowing investigators to reconstruct events leading up to the disappearance. This information is vital for both public reporting and private investigations, as it can guide search efforts and identify potential witnesses or key evidence. Families and authorities rely on this timeline to take immediate and effective action.

For cases requiring expert support, Lauth Investigations provides professional assistance through a team of seasoned investigators with backgrounds in law enforcement, military, and cyber investigations. Their experience ensures that every detail, from the initial timeline to deeper background checks, is thoroughly examined. With proven methods and advanced tools, they help uncover critical leads and provide families with accurate, actionable information during these challenging situations.

Important Personal and Behavioral Information

Mental and Physical Health

If the missing person has any mental health conditions, physical disabilities, or medical needs, include these details. This helps prioritize urgency and guides how to approach the individual if found.

Recent Emotional State

Mention if the person seemed stressed, depressed, anxious, or emotionally unstable before disappearing. This helps investigators assess possible risks and motivations.

Hobbies and Interests

List regular activities, places they visit often, and any social habits. This includes parks, clubs, libraries, or restaurants they go to. These patterns can guide the investigation to locations they might visit on their own.

Social Media Activity

If they were active on social media, mention platforms and account names. Investigators can monitor digital activity or check for recent posts that hint at their location or mindset.

People Connected to the Missing Person

Friends and Contacts

List close friends, partners, co-workers, or recent acquaintances. Include their phone numbers or social profiles if possible. These people might know something useful or may have seen the person recently.

Family Members

Share details about relatives the missing person might try to contact. Sometimes, they leave to visit someone they trust or want to stay with.

Conflicts or Issues

Mention any ongoing personal problems, disputes, or threats. If someone had argued with the missing person, they may have relevant information or involvement.

Technical Data That Assists the Investigation

Phone and Device Tracking

Provide the missing person’s phone number and mobile carrier. If the person has GPS or tracking apps enabled, this data can be helpful. Investigators may also review call logs or messages.

Financial Activity

Include bank account numbers or the names of financial institutions used by the person. Check if there was any recent activity, such as ATM withdrawals or purchases, which might show their location.

Vehicle Information

If the person owns or was using a vehicle, give details such as make, model, color, license plate, and any unique features. The vehicle could be spotted by license plate readers or surveillance footage.

Security Footage and Cameras

If the area where the person went missing had security cameras, collect any footage or contacts who might have it. This includes public transit stations, stores, homes, or traffic lights.

Steps to Take for an Effective Investigation

File a Police Report

Contact local law enforcement as soon as possible. Provide all the details mentioned above. Request the case number and name of the officer handling the report for follow-up.

Hire a Private Investigator

If the case does not progress or you want extra support, consider hiring a private investigator. They can focus on leads the police may not pursue due to limited resources or time. A private investigation allows for more personalized attention and detailed tracking.

Distribute Flyers and Photos

Use recent and clear photos of the missing person. Include their physical description and contact information. Distribute flyers in local neighborhoods, stores, and community boards.

Share on Social Media

Post the information on community pages and missing person groups. Ask friends and family to share. Be sure the post includes a photo, last known location, and a number to call if anyone sees them.

Use Online Missing Person Databases

Add the person’s details to national or local missing person websites. These platforms help connect reports across areas and allow others to look up and share verified information.

How an Investigator Uses This Information

A private investigator uses the data to create a search plan. They may begin with interviews and background checks. They might use surveillance, online tools, or fieldwork to locate leads. The more accurate the information, the faster and more focused the process becomes.

They may also review:

  • Cell phone records
  • Travel history
  • Medical files (with legal access)
  • Security footage
  • Online communications

Their goal is to gather facts, trace the person’s path, and locate them safely.

Tips for Providing Useful Information

  • Stay calm and give facts without guessing
  • Be clear about dates and times
  • Share all known names and contacts
  • Keep a written log of everything you do or learn
  • Provide updates to the police or private investigator regularly

When to Seek Professional Help

If a loved one has been missing for more than 24 hours, and there are signs of danger or unusual behavior, act quickly. Waiting too long can reduce the chances of finding them safely.

If law enforcement cannot give the case the attention it needs, a private investigation is a strong option. Investigators focus only on your case and use tools that the public may not have access to.

Conclusion

Finding a missing loved one requires accurate information, quick reporting, and consistent follow-up. Clear facts about the person, their behavior, and last known movements are the foundation of any successful investigation. Whether through police support or a private investigator, detailed input increases the chance of a positive outcome.

Make sure you stay organized, communicate clearly, and use every resource available.

What Makes a Reliable Medical Store in Corpus Christi

A reliable medical store helps people get the right health products. It must provide trusted services, clear advice, and quality medicine. In Corpus Christi, many people look for dependable places to fill prescriptions or get help for health needs. This article explains what to check when choosing a good medical store in Corpus Christi.

The Role of a Medical Store

A medical store helps people manage health problems. It offers prescription drugs, over-the-counter products, and health care items. Some also offer compounding services. These stores support doctors and patients by giving the right medicine and correct advice.

Meeting Daily Health Needs

A medical store must keep all necessary drugs and supplies. It should stock painkillers, allergy relief, antibiotics, and supplements. People should find what they need without delay.

Providing Accurate Guidance

A good pharmacy gives clear instructions. Staff must explain how to use each medicine. This avoids confusion or misuse.

Features of a Trusted Pharmacy

A reliable pharmacy follows safety rules. It only sells approved drugs. It checks prescriptions and prevents errors. The staff must know drug names, side effects, and usage.

Licensed and Approved Services

The pharmacy must have proper licences. It should meet all local health rules. Staff must include licensed pharmacists who check all prescriptions before sale.

Clean and Organised Space

A clean medical store keeps products safe. All drugs should be stored at the right temperature. The store should arrange products by type. This makes it easier for staff and customers.

Importance of a Compounding Pharmacy

Some patients need special drug forms. A compounding pharmacy makes Custom Medication. This helps people with allergies or unique medical needs.

Serving Special Requirements

A compounding pharmacy can change the form of a drug. It can make a pill into a liquid or add a flavour for children. It can also remove certain ingredients if a patient is allergic.

Helping Doctors Provide Exact Doses

Doctors may ask for a special dose. Compounding allows the pharmacy to prepare that dose. This helps in treating rare conditions or adjusting regular drugs for certain patients.

Benefits of Custom Medication

Custom Medication suits the patient better. It avoids ingredients that may cause a reaction. It can help people who cannot take regular forms of a drug.

Improving Patient Compliance

Many patients skip medicine due to bad taste or side effects. Custom Medication improves comfort. This leads to better health outcomes.

Reducing Wasted Medicine

When a medicine is made as needed, patients avoid large unused packs. This lowers waste and saves money.

Qualities to Expect from a Good Medical Store in Corpus Christi

People in Corpus Christi need fast service, transparent pricing, and trusted support when it comes to healthcare. With increasing demand for personalized treatment options, many residents look beyond traditional pharmacies for more tailored solutions. A reliable medical store in Corpus Christi must prioritize not only efficient service but also the safety and accuracy of each prescription to meet the community’s health needs.

For patients requiring custom medication formulas, Compounding Pharmacy Corpus Christi offers specialized pharmaceutical solutions that standard pharmacies may not provide. These pharmacies prepare medications tailored to individual dosages, ingredients, and delivery methods based on doctors’ prescriptions. From pediatric suspensions to hormone therapy and allergy-sensitive formulations, compounding pharmacies play a vital role in delivering patient-specific care while ensuring the highest standards of safety and effectiveness.

Fast Prescription Filling

Customers should not wait long. The store must fill prescriptions quickly and carefully.

Clear Labelling and Packaging

Each medicine must have clear labels. The label must show the name, dosage, use, and expiry date.

Availability of Products

A good medical store keeps popular and rare products. If an item is not in stock, the pharmacy must arrange it fast.

Easy Refill Options

Some stores offer online refills or phone orders. This helps busy people or those with regular prescriptions.

Staff Support and Customer Service

Trained staff are key. They must answer questions. They must guide people in a simple way. They must respect privacy and handle each case with care.

Friendly and Knowledgeable Team

Pharmacy staff must stay calm and respectful. They must help older people, parents, or anyone with questions.

Respect for Customer Privacy

A medical store must keep customer details safe. All personal and health data must be secure.

Choosing the Right Medical Store

To choose a reliable medical store in Corpus Christi, people should check reviews, visit the store, and ask questions.

Check Local Reviews

Online reviews help people see how others rate a store. Look for comments about speed, service, and staff knowledge.

Ask Your Doctor

Doctors often suggest trusted pharmacies. They know which stores offer good service and care.

Visit in Person

A visit shows how clean and stocked the store is. It helps people meet the staff and feel confident in their choice.

Common Mistakes to Avoid

Some people choose stores only by price or looks. This may cause problems. Cheaper is not always better if quality suffers.

Ignoring Licensing

Always ask if the store is licensed. An unlicensed store may not follow safety rules.

Not Asking Questions

If staff do not answer clearly, that is a warning sign. Customers must feel free to ask about medicines.

Overlooking Product Expiry

Always check expiry dates. Reliable stores do not keep old or near-expiry products.

Medical Stores and Community Health

A good medical store supports the whole community. It helps during health scares, flu season, or emergencies. It keeps supplies ready and helps people stay healthy.

Partnering with Health Programmes

Some pharmacies join health drives. They offer vaccines, blood tests, or advice sessions.

Helping People with Long-term Illness

People with diabetes, asthma, or high blood pressure need constant care. A good store helps them stay on track with medicine and health tips.

Final Thoughts

A reliable medical store in Corpus Christi gives safe, fast, and helpful service. It offers quality products, Custom Medication, and support from trained staff. A compounding pharmacy can help people who need special drug forms. A good store meets everyday needs and also solves special health issues.

People must check licences, ask questions, and review services before choosing a pharmacy. This helps them stay safe and healthy. Whether they need common medicine or Custom Medication, the right medical store will offer the right help at the right time.

How to Fix a Leaking Shower Screen Door

A leaking shower screen door can cause water to spill onto your bathroom floor. This can damage tiles, walls, and nearby fittings. Fixing the problem early helps avoid further issues. This guide will show how to repair a shower screen door and stop the water leak.

Identify the Leak Source

First, you must find where the leak starts. Check the shower screen door from top to bottom. Look at the hinges, corners, seals, and the door frame. Water may leak through the bottom gap or around the door edges. Use a dry towel to wipe the screen and look for new water marks. This helps you locate the exact area of the leak.

Common Leak Areas

  • Door hinges
  • Bottom rubber seal
  • Frame joints
  • Glass panels meeting points

Once you know the leak source, you can begin the shower screen repair.

Clean the Shower Screen Area

Before fixing anything, it’s important to clean the area around the leak thoroughly. Remove any soap residue, dirt, and mold using a gentle cleaning solution and a soft cloth. A clean and dry surface ensures that sealants and adhesives bond properly, which is essential for a long-lasting repair. Skipping this step can lead to poor adhesion, causing leaks to return over time.

In many bathroom upgrades, leaks often appear around glass enclosures due to improper sealing or wear and tear. That’s why many homeowners turn to shower screen installation services to ensure the job is done right the first time. These services include proper surface preparation, precise fitting, and the use of high-quality sealing materials to prevent future leaks. By relying on experienced installers, you can enhance both the appearance and durability of your bathroom while avoiding recurring maintenance issues.

Tools for Cleaning

  • Soft cloth
  • Sponge
  • Vinegar and water mix
  • Mild soap
  • Plastic scraper (optional for grime removal)

Do not skip this step. A clean surface ensures a better result in shower screen repair.

Check the Door Seal

A damaged or loose seal can cause leaks. The rubber or silicone seal around the door keeps water inside. Over time, this seal can wear out. Check for cracks, gaps, or peeling.

Replace a Damaged Seal

  1. Remove the old seal from the bottom or side of the door.
  2. Clean the area where the seal was attached.
  3. Cut a new seal to match the old one in length.
  4. Push the new seal into place or glue it, depending on the type.
  5. Close the door to test the seal.

Make sure the new seal fits tightly. If water still leaks, move to the next step.

Reapply Silicone Sealant

Old or broken silicone around the frame can let water escape. Silicone sealant fills the gaps and prevents water flow outside the shower.

Steps to Reapply Silicone

  1. Remove the old silicone with a scraper or blade.
  2. Wipe the area clean and dry.
  3. Apply new silicone in a straight line along the joint.
  4. Use your finger or a smoothing tool to flatten it.
  5. Let it dry for 24 hours.

Choose a waterproof silicone made for bathroom use. This ensures the shower screen door stays sealed during daily use.

Adjust the Door Hinges

If the shower screen door does not close properly, water can leak through the gap. Check the alignment of the door. A tilted door may leave a space at the bottom or side.

How to Adjust the Hinges

  1. Open the door and look for loose screws on the hinge.
  2. Tighten the screws with a screwdriver.
  3. Test the door by opening and closing it.
  4. Realign if needed, so the door sits flush with the frame.

Proper alignment helps prevent water from escaping. If the hinge is broken, you may need to replace it.

Check the Frame Joints

The metal or plastic frame that holds the shower screen panels can also leak. Look at the corners where panels meet. If water leaks here, apply a clear sealant.

How to Seal Frame Joints

  1. Dry the joint area with a cloth.
  2. Apply clear waterproof sealant to the joint.
  3. Let it set for the time mentioned on the product.

This method works well for both framed and semi-frameless shower screen doors.

Use a Shower Door Water Deflector

A water deflector is a small plastic or rubber piece that sticks to the edge of the door. It directs water back into the shower tray.

Install a Water Deflector

  1. Clean the edge of the glass door.
  2. Cut the deflector to the right size.
  3. Peel off the backing tape.
  4. Stick it along the edge of the door.
  5. Press firmly to hold it in place.

This small part helps reduce water leaks during a shower.

Fix Shower Tray Alignment

If your shower tray is uneven, water may flow towards the door instead of the drain. Use a spirit level to check the slope.

Correct a Poorly Aligned Tray

  1. Remove the panels around the tray if needed.
  2. Lift the tray and place shims to adjust the angle.
  3. Ensure water runs to the drain.
  4. Reattach the panels and test the tray.

A level tray helps keep water inside the shower area.

Prevent Future Leaks

After fixing the shower screen door, take simple steps to prevent leaks in the future.

Tips for Prevention

  • Clean the seals weekly
  • Wipe water off the screen after each shower
  • Avoid slamming the door
  • Check for loose parts every month
  • Replace old seals every 2 to 3 years

Regular care helps your shower screen last longer and reduces the need for repair.

When to Call a Professional

Some shower screen repairs are simple, but others may need a professional. If you have a cracked glass panel or a warped frame, do not try to fix it yourself. Call a licensed shower screen repair service.

Signs You Need Help

  • Glass is broken
  • Frame is bent or damaged
  • Door will not stay closed
  • Leak continues after repairs

Getting expert help ensures safety and a long-lasting fix.

Final Thoughts

Fixing a leaking shower screen door does not always require a full replacement. You can solve most problems by checking the seals, applying silicone, adjusting hinges, and sealing joints. Clean the area well and use the right tools. Keep the shower area dry and inspect it often. These steps help reduce damage and keep your bathroom clean and safe.

With the right approach, you can complete your own shower screen repair without stress. Keep materials like sealant and spare seals ready at home for quick fixes. If the leak returns or worsens, contact a specialist for support.

How to Install a Kitchen Sink Tap in Singapore Homes

Homeowners in Singapore often need to replace or install a kitchen sink tap. This process requires basic tools and an understanding of how plumbing systems work. This guide explains each step clearly. It focuses on safe and efficient methods for kitchen sink tap installation in Singapore homes.

Tools and Materials Needed

Before starting, gather the necessary tools and materials. This prevents delays and ensures a smooth installation.

Tools

  • Adjustable wrench
  • Basin wrench
  • Pipe tape
  • Bucket
  • Cleaning cloth
  • Screwdriver

Materials

  • New kitchen sink tap
  • Tap hoses
  • Mounting nuts and washers
  • Rubber gaskets

Make sure the new tap fits your sink. Most kitchen taps in Singapore follow standard sizes, but it is important to check.

Preparation Steps

Step 1: Turn Off the Water Supply

Find the water valves under the sink. Turn them clockwise to stop the water. If there are no valves, turn off the main water supply. Open the old tap to release remaining water in the pipes.

Step 2: Clear the Area

Remove items stored under the sink. Place a bucket below the tap to catch water. Wipe the area clean to improve access and visibility.

Step 3: Disconnect the Old Tap

Use the wrench to loosen the water hoses. Then use the basin wrench to remove mounting nuts holding the tap in place. Lift out the old tap.

Installing the New Kitchen Sink Tap

Step 1: Fit the Rubber Gasket

Place the rubber gasket or seal ring on the bottom of the new tap. This prevents water leaks. Align the tap with the hole in the sink.

Step 2: Insert the Tap into the Sink

Insert the tap base into the hole on the sink. Hold it steady from above while working underneath the sink.

Step 3: Secure the Tap

From below the sink, slide the washer and nut onto the tap thread. Tighten the nut by hand, then use a basin wrench for final tightening. Make sure the tap is straight before fully tightening.

Step 4: Connect the Water Hoses

Attach the hoses to the tap and the shut-off valves. Use pipe tape on the threads to improve the seal. Tighten with a wrench, but do not overtighten. Check the manufacturer’s instructions for correct hose connections.

Step 5: Check for Leaks

Turn the water supply back on. Slowly open the tap. Look under the sink for drips. Tighten any connections if needed. If you see water leaks from the base of the tap, check the gasket placement and nut tightness.

Tips for Safe Installation

  • Always shut off the water supply before starting work.
  • Use proper tools to avoid damaging parts.
  • Do not overtighten connections, as this can cause leaks.
  • Keep the work area dry to reduce the chance of slipping.
  • Follow the tap manufacturer’s instructions.

When to Call Plumbing Services

While many people can install a tap themselves, some situations require professional plumbing services in Singapore. Issues like major pipe leaks, water pressure problems, or installing complex fixtures go beyond simple DIY tasks. Attempting to fix these problems without the right tools or expertise can lead to bigger and costlier issues over time. That’s why knowing when to call in a professional is essential for maintaining your home’s plumbing system.

If you’re dealing with persistent clogs, water heater issues, or pipe replacements, hiring an experienced Plumber Singapore can save time and prevent future damage. Licensed plumbers not only diagnose the root cause efficiently but also ensure the repairs meet safety standards. Whether it’s for routine maintenance or emergency repairs, having a reliable plumber on call ensures your plumbing system runs smoothly and efficiently year-round.

These include:

Old or Damaged Pipes

If pipes are rusty or damaged, replacing the tap may not fix the problem. Professional plumbers can assess and repair pipework.

Low Water Pressure

If water pressure is too low, there may be a deeper issue in the plumbing system. Experts can find and fix the cause.

Incorrect Tap Size

If the tap does not fit the sink or the existing pipework, a plumber can provide the correct solution.

Leaks After Installation

If leaks continue despite proper installation, a plumbing expert should inspect the system.

Hiring plumbing services ensures safety and prevents damage to your home.

Benefits of Proper Installation

Correct installation of a kitchen sink tap has several advantages:

  • No leaks, which saves water and reduces bills
  • Proper water pressure for washing and cleaning
  • Safe and clean water supply
  • Longer tap lifespan
  • Better kitchen appearance

Types of Kitchen Sink Taps for Singapore Homes

Choosing the right tap for your kitchen depends on your needs. Here are some common types found in Singapore homes:

Single Lever Taps

These taps control both hot and cold water with one handle. They are simple to use and install.

Dual Handle Taps

These taps have separate controls for hot and cold water. They offer better control over water temperature.

Pull-Out Spray Taps

These taps have a flexible nozzle that can be pulled out. They help with cleaning large pots and reaching corners of the sink.

Wall-Mounted Taps

These taps attach to the wall above the sink. They save counter space but may need extra work during installation.

Choose a tap based on your sink layout, water supply type, and personal preference.

Maintenance Tips After Installation

Keep your tap in good condition with simple maintenance steps:

  • Clean the tap with a damp cloth and mild soap
  • Avoid strong chemicals that damage the surface
  • Check for leaks every few months
  • Replace worn-out hoses and washers
  • Tighten loose parts

Regular checks prevent problems and extend the life of your kitchen tap.

Common Mistakes to Avoid

Avoid these errors during kitchen sink tap installation:

  • Forgetting to turn off the water supply
  • Using the wrong size tools
  • Overtightening parts
  • Ignoring leaks after installation
  • Installing a tap that does not match your sink or pipe fittings

Being careful during each step helps you avoid these issues.

Cost of Kitchen Sink Tap Installation in Singapore

The cost depends on several factors:

  • Type of tap
  • Condition of existing plumbing
  • Labour charges from plumbing services

On average, the cost of tap installation by professionals in Singapore ranges from SGD 80 to SGD 150. DIY installation can save money, but only if done correctly.

Conclusion

Installing a kitchen sink tap in Singapore homes is possible with the right tools and steps. Follow clear procedures, use proper equipment, and check for leaks. For complex issues or if you lack tools, contact plumbing services. A good installation ensures a working tap, clean water, and fewer plumbing problems in the future.

This guide helps homeowners handle basic tap installation tasks safely and clearly. Whether you choose to do it yourself or call plumbing services, knowing the steps is useful for all homes in Singapore.

Como Planejar umas Férias de 2 Semanas no Egito e Jordânia

Viajar para o Egito e Jordânia oferece uma experiência rica em história, cultura e paisagens naturais. Um plano bem definido ajuda a aproveitar melhor o tempo e os recursos. Este guia fornece instruções claras e simples para organizar umas férias de duas semanas no Egito e na Jordânia. O conteúdo é optimizado para os termos “Egito Tour” e “Férias no Egito e Jordânia”, traduzidos como “Tour Egito” e “Férias no Egito e Jordânia”.

Por que escolher o Egito e a Jordânia

O Egito oferece monumentos antigos, como as Pirâmides de Gizé e os templos de Luxor. A Jordânia apresenta atrações como Petra, o Mar Morto e o deserto de Wadi Rum. Juntos, esses dois países formam um itinerário ideal para quem gosta de história e natureza. Se precisar de mais informações sobre passeios no Egito e na Jordânia, clique aqui: https://www.egypttoursplus.com/pt/

Melhor época para visitar

Clima

A melhor época para visitar o Egito e a Jordânia vai de outubro a abril. As temperaturas são mais agradáveis, especialmente em regiões desérticas. Evite os meses de verão, pois o calor pode ser extremo.

Eventos e feriados

Evite feriados religiosos como o Ramadã, pois muitos serviços funcionam de forma limitada. Consulte calendários locais antes de reservar.

Roteiro sugerido de 2 semanas

Dia 1-3: Chegada e Cairo

Reserve um voo para o Cairo. Visite as Pirâmides de Gizé, a Esfinge e o Museu Egípcio. Caminhe pelo mercado de Khan El Khalili. Planeje hospedagem próxima ao centro para facilitar o transporte.

Dia 4-5: Luxor

Pegue um voo interno para Luxor. Explore o Templo de Karnak, o Vale dos Reis e o Templo de Hatshepsut. Uma opção é fazer um passeio de balão ao nascer do sol.

Dia 6-7: Aswan e Abu Simbel

Viaje para Aswan de trem ou avião. Visite a Represa Alta e o Templo de Filae. Faça um passeio até os templos de Abu Simbel. Hospede-se em um hotel com vista para o rio Nilo.

Dia 8: Voo para Amã, Jordânia

Pegue um voo do Cairo ou Aswan para Amã. Reserve um hotel próximo ao centro para acesso fácil a restaurantes e atrações.

Dia 9-10: Petra

Viaje de carro ou ônibus até Petra. Dedique um dia inteiro para explorar o sítio arqueológico. Caminhe pelo Siq até chegar ao Tesouro. Use calçados confortáveis.

Dia 11: Wadi Rum

Siga para o deserto de Wadi Rum. Faça um passeio de jipe e passe a noite em um acampamento beduíno. Leve roupas para frio, pois a temperatura à noite pode cair.

Dia 12: Mar Morto

Viaje até o Mar Morto. Flutue nas águas salgadas e aproveite os benefícios dos sais minerais. Reserve um hotel com acesso direto à praia.

Dia 13: Jerash e Amã

Visite as ruínas romanas de Jerash. Retorne a Amã para fazer compras ou visitar museus locais. Aproveite a culinária típica.

Dia 14: Retorno

Volte ao aeroporto de Amã para o voo de retorno. Chegue com antecedência para evitar imprevistos.

Transporte entre as cidades

Egito

Use voos internos para distâncias longas como Cairo-Luxor-Aswan. Para distâncias curtas, use táxis ou aplicativos de transporte.

Jordânia

Alugue um carro ou use serviços de transporte turístico. Os trajetos entre Petra, Wadi Rum e o Mar Morto são diretos e bem sinalizados.

Documentos e vistos

Brasileiros precisam de visto para entrar no Egito e na Jordânia. O visto pode ser obtido online ou no aeroporto. Verifique a validade do passaporte com pelo menos seis meses antes da data de retorno.

Moeda e custos

Egito

A moeda é a libra egípcia. Leve dólares ou euros para trocar em casas de câmbio. Cartões de crédito são aceitos em hotéis e restaurantes.

Jordânia

A moeda é o dinar jordaniano. Faça câmbio em bancos ou casas autorizadas. Leve dinheiro em espécie para regiões desérticas.

Segurança e saúde

Evite áreas com restrições do governo. Beba água engarrafada. Leve protetor solar, chapéu e remédios básicos. Contrate um seguro viagem.

Dicas de vestuário

Use roupas leves e que cobrem ombros e joelhos. Isso ajuda a respeitar os costumes locais. Em locais religiosos, leve um lenço para cobrir a cabeça.

Alimentação

A culinária no Egito inclui pratos como koshari e falafel. Na Jordânia, experimente mansaf e shawarma. Evite alimentos crus fora de restaurantes confiáveis.

Comunicação

Compre chips locais com internet. Use aplicativos de tradução e mapas. O inglês é falado em áreas turísticas.

Conclusão

Planejar umas férias de duas semanas no Egito e Jordânia exige atenção aos detalhes. Dividir os dias entre as principais atrações ajuda a aproveitar melhor o tempo. Com este guia, é possível organizar uma viagem segura, econômica e culturalmente rica. Use este plano como base para montar o seu próprio roteiro de Tour Egito e Férias no Egito e Jordânia.

How to Repair Water-Damaged Wooden Window Frames

Water can cause serious damage to wooden window frames. It weakens the wood, creates cracks, and leads to rot. Knowing how to repair water-damaged wood can help protect your windows and maintain your home. This guide explains simple steps to repair and protect wooden window frames effectively.

Understanding Water Damage in Wooden Window Frames

Water enters wood through cracks, paint damage, or gaps around windows. Once inside, moisture causes the wood to swell and weaken. If left untreated, it leads to rot. Spotting water damage early is important to avoid expensive window repair services later. Learn more about window repair services and helpful tips on this website.

Common Signs of Water Damage

  • Cracks in the wood
  • Soft or spongy texture
  • Paint peeling or bubbling
  • Mold or mildew smell
  • Discoloration around window edges

Inspect your windows often. Early detection can save time and money.

Tools and Materials You Will Need

Prepare these basic tools before starting:

  • Putty knife
  • Sandpaper
  • Wood filler
  • Paint scraper
  • Primer and paint
  • Wood hardener
  • Protective gloves
  • Safety goggles

Using the correct tools ensures a clean and strong repair.

Step 1: Inspect the Damage

Start by checking the entire window frame. Use a screwdriver to press the wood gently. Soft spots mean deeper water damage. Mark the areas that need repair. This inspection helps plan the next steps clearly.

Step 2: Remove Damaged Wood

Use a putty knife or paint scraper to remove all soft or rotten wood. Scrape until you reach solid wood. Removing all damaged parts is important. If you leave soft wood, the damage can spread again.

Step 3: Apply Wood Hardener

Apply wood hardener to the cleaned area. Use a brush and cover the wood fully. The hardener strengthens weak wood and stops future damage. Let it dry as instructed on the product label.

Step 4: Fill the Gaps

After the hardener dries, use wood filler to fill the gaps. Press the filler firmly into the cracks and holes. Smooth the surface with a putty knife. Let the filler dry completely before moving on.

Step 5: Sand the Surface

Once the filler is dry, sand the surface gently. Use fine-grit sandpaper for a smooth finish. Sanding prepares the wood for priming and painting. A smooth surface also helps the paint stick better.

Step 6: Prime and Paint the Frame

Apply a coat of primer to the repaired area. Primer seals the wood and protects it from future water damage. After the primer dries, paint the frame with good-quality exterior paint. Two coats are better for strong protection.

Step 7: Check the Seals and Caulking

Inspect the window seals and caulking around the frame. Remove old or cracked caulk. Apply a fresh bead of waterproof caulk to close any gaps. Good sealing keeps water out and protects your repair work.

Preventing Future Water Damage

Good maintenance can extend the life of your wooden window frames. Follow these tips:

  • Check frames every few months for cracks or soft spots
  • Repaint frames when the paint shows signs of wear
  • Reseal gaps with waterproof caulk regularly
  • Clean windows to prevent moisture build-up
  • Fix leaks around windows quickly

These simple steps prevent costly window repair services later.

When to Call Professional Window Repair Services

Sometimes, damage is too big for simple repairs. If you see widespread rot, structural damage, or frames pulling away from walls, it is time to call professional window repair services. Experts have the right tools and skills to replace or rebuild frames safely.

Professional help ensures the frame stays strong and matches the style of your home. It also helps prevent more water damage and higher costs in the future.

Costs of Repairing Wooden Window Frames

DIY repairs usually cost less. Materials like wood filler, hardener, primer, and paint are affordable. However, large repairs by window repair services can cost more based on the damage and window size.

Common cost factors include:

  • Size of the window
  • Extent of the damage
  • Labour charges
  • Type of materials used

Getting a few quotes from local repair services can help you plan the budget better.

How Often Should You Maintain Wooden Window Frames

Inspect and maintain wooden window frames at least once a year. In areas with heavy rain or humidity, check every six months. Regular maintenance catches problems early and reduces the need for major repairs.

Simple actions like repainting, resealing, and cleaning help your windows last longer.

Conclusion

Repairing water-damaged wooden window frames is not difficult if you follow the right steps. Regular inspection, quick repair, and good maintenance prevent serious damage and save money. Use proper tools, quality materials, and work carefully for strong and lasting results.

If damage is severe or you feel unsure, hiring professional window repair services is a smart choice. Professionals ensure the job is done right and protect your home for years to come.

Taking care of your wooden window frames keeps your home looking good and staying strong against weather damage.

How Graphic Design Services Shape Visual Storytelling

Graphic design services help businesses and individuals communicate ideas visually. Well-designed graphics create strong impressions and make information easy to understand. These services use colors, shapes, and typography to convey messages effectively.

Visual storytelling combines images and text to engage audiences. It helps brands build recognition and connect with people emotionally. Professional graphic design services ensure that visuals support a clear and compelling narrative.

The Role of Graphic Design in Visual Storytelling

Communicating Messages Clearly

Graphic design presents complex information in a simple and visually appealing format. Infographics, charts, and illustrations help audiences process key points quickly, making them essential tools for businesses looking to convey messages effectively. Whether explaining a product, showcasing data, or presenting a brand story, well-designed visuals enhance communication and engagement. A strong design approach not only captures attention but also ensures that the information is easy to understand and retain.

In today’s digital landscape, brands rely on innovative design solutions to create impactful marketing materials. Lotiva provides cutting-edge graphic design services that focus on clarity, aesthetics, and functionality. A well-structured design, with consistent layouts and typography, improves readability and strengthens brand identity. By prioritizing visual hierarchy and user experience, designers craft compelling graphics that keep audiences engaged while reinforcing key messages.

Creating Emotional Connections

Colors, images, and typography influence emotions. Bright colors convey excitement, while soft tones create a calm feeling. Choosing the right design elements helps brands connect with their audience on an emotional level.

Well-crafted visuals make stories more relatable. They capture attention and encourage people to engage with content. Effective design turns a simple message into a memorable experience.

Key Elements of Graphic Design in Storytelling

Color Theory and Mood

Colors affect how people perceive a message. Warm colors like red and yellow create energy. Cool colors like blue and green bring a sense of calm. Designers select color palettes based on the mood they want to create.

Using consistent colors strengthens brand identity. Recognizable color schemes help businesses stand out. Every color choice should align with the story being told.

Typography and Readability

Typography plays a major role in how people understand written content. Fonts should be clear and easy to read. Bold headlines grab attention, while simple body text improves readability.

Designers choose fonts that match the brand’s tone. A modern font suits a technology company, while a handwritten style may work for a creative brand. Proper font selection ensures the message is both readable and engaging.

Composition and Layout

A well-organized layout guides the viewer’s eye. Designers use spacing, alignment, and contrast to structure content. A balanced design makes information easy to follow.

Visual hierarchy directs attention to important details. Larger images or bold text highlight key points. A strong layout helps viewers understand the message at a glance.

Applications of Graphic Design in Different Industries

Marketing and Advertising

Businesses use graphic design to promote products and services. Advertisements, social media posts, and email campaigns rely on visuals to attract customers. Strong visuals increase engagement and brand awareness.

Logos, brochures, and banners communicate a brand’s identity. A consistent design approach builds trust with consumers. Professional design makes marketing materials more effective.

Website and App Design

Websites and mobile apps need visually appealing layouts. Graphic design ensures a seamless user experience. Simple navigation, clear fonts, and attractive colors improve usability.

Well-designed icons and buttons make interfaces easy to use. A professional website design keeps visitors engaged and encourages them to take action.

Publishing and Media

Magazines, newspapers, and books rely on design for readability. Proper text alignment and image placement enhance the reading experience. Visual storytelling makes content more interesting.

Online media platforms use graphics for articles and videos. Thumbnails, banners, and animations improve content presentation. A strong design approach increases audience engagement.

How Businesses Benefit from Professional Graphic Design

Strengthening Brand Identity

A consistent visual identity builds recognition. Logos, colors, and fonts create a lasting impression. Graphic design services help businesses establish a strong brand image.

Well-designed business cards, packaging, and advertisements make a company appear more professional. A clear brand identity increases credibility and customer trust.

Increasing Engagement and Sales

Attractive visuals capture attention and encourage interaction. Social media graphics, email templates, and promotional materials drive customer engagement. A well-crafted design strategy boosts marketing results.

Customers are more likely to trust businesses with high-quality visuals. Clear and appealing designs improve conversion rates. A professional look influences purchasing decisions.

The Future of Graphic Design in Storytelling

Advances in Digital Design Tools

New software and technology allow designers to create more detailed and dynamic visuals. Digital tools offer better control over colors, layouts, and animations. These improvements enhance storytelling.

Artificial intelligence assists designers by automating tasks like resizing images and suggesting color palettes. These advancements make the design process faster and more efficient.

Growing Demand for Visual Content

Businesses and media platforms rely on visuals to communicate. The rise of social media and online advertising increases the need for professional graphic design. High-quality graphics improve content performance.

As visual storytelling evolves, graphic design remains essential. Companies that invest in strong visuals stand out in a competitive market.

Conclusion

Graphic design services shape visual storytelling by improving communication, building emotional connections, and enhancing brand identity. Clear visuals make messages more engaging and easy to understand.

Businesses benefit from professional design through stronger branding, increased engagement, and higher sales. As digital tools improve, the role of graphic design in storytelling will continue to grow.

How Long Does It Take to See Results from Cosmetic Dentistry?

Cosmetic dentistry helps people improve their smiles. Many patients wonder how long it takes to see the results from these procedures. The timeline varies depending on the type of treatment. Some procedures offer immediate results, while others take time. Understanding the process and expected recovery times can help manage expectations and guide decisions.

This article will explore the different cosmetic dentistry treatments and how long it typically takes to see results. Whether you are considering teeth whitening, veneers, or dental implants, knowing what to expect is crucial for a successful outcome.

Types of Cosmetic Dentistry Procedures

Teeth Whitening

Teeth whitening is one of the most popular cosmetic dental treatments. It involves bleaching teeth to remove stains and discoloration, providing a brighter smile. This procedure can be done at the dentist’s office or at home with professional-grade products.

In-Office Whitening

In-office teeth whitening offers the fastest results. The dentist applies a bleaching agent to the teeth, often using a special light to enhance the effect. Results can be seen immediately after the procedure. Most patients experience a smile that is several shades brighter.

At-Home Whitening

At-home whitening products take longer to show results. These products, prescribed by a dentist, usually come in the form of custom trays filled with a bleaching solution. It can take several days to weeks to notice significant improvement, depending on the product’s strength and the level of discoloration.

Veneers

Veneers are thin shells that cover the front of the teeth. They are custom-made to fit your teeth and are often used to correct issues like chips, gaps, or stains.

The procedure to place veneers generally takes two visits. During the first visit, the dentist prepares the teeth by removing a small amount of enamel. Then, an impression is taken to create custom veneers. During the second visit, the veneers are placed and adjusted.

Patients can typically see immediate results after the second visit. However, it may take a few days to get used to the feel of the new veneers.

Dental Implants

Dental implants are used to replace missing or severely damaged teeth. This procedure involves placing a metal post into the jawbone to act as a root for a replacement tooth. It requires a few months for the implant to properly fuse with the bone, a process called osseointegration.

Once the implant has healed, a crown is placed on top of it. It can take several months to a year for the entire process to be completed. However, once the implants are in place, the results are permanent and natural-looking.

Bonding

Dental bonding is a quick and affordable way to improve the appearance of teeth. The dentist applies a tooth-colored resin to fix issues like chips, cracks, or gaps. The procedure can usually be completed in one visit, and the results are immediate.

Patients can expect to see an improvement in their smile right away. However, bonding is not as durable as veneers, and it may need to be replaced after a few years.

Invisalign

Invisalign is a popular alternative to traditional braces for straightening teeth. It uses clear plastic aligners to gradually shift teeth into proper alignment. Invisalign treatment can take anywhere from several months to a few years, depending on the severity of the misalignment.

Patients typically wear each set of aligners for about two weeks before switching to the next set. Results can be seen gradually, with significant changes occurring over time. Many patients notice noticeable improvements within the first few months of treatment.

Factors That Affect the Timeline for Results

Type of Procedure

The type of cosmetic dental procedure plays a major role in how long it takes to see results. As discussed, procedures like teeth whitening or bonding offer quick results, while treatments like dental implants or Invisalign may take months or even years.

Patient’s Oral Health

The health of your teeth and gums can also impact how quickly results are achieved. Patients with healthy teeth and gums may experience quicker healing times and better results. If a patient has underlying dental issues, additional treatments may be required before cosmetic procedures, which could extend the timeline for results.

Age

As people age, their teeth may become more susceptible to staining, decay, or damage. Older patients may need more extensive procedures, which could take longer to achieve optimal results. Younger patients may experience faster recovery times for procedures like bonding or veneers.

Treatment Goals

The desired outcome of the treatment affects the timeline. For example, a patient who wants only minor changes, such as whitening, will see results faster than someone who wants to replace multiple teeth with implants.

Follow-up Care

Proper follow-up care is essential to achieving the best results from cosmetic dentistry. Some procedures, like veneers or dental implants, may require follow-up visits to ensure everything is healing properly. Following the dentist’s post-treatment instructions can help speed up the process and ensure long-lasting results. If you need more information about the cosmetic dentistry from this website.

How to Speed Up the Results of Cosmetic Dentistry

Good Oral Hygiene

Maintaining good oral hygiene is crucial after any cosmetic dental procedure. Brushing twice a day, flossing, and using mouthwash can prevent complications that could delay results. Keeping the teeth clean also helps preserve the longevity of treatments like bonding, veneers, and implants.

Avoiding Staining Foods

After teeth whitening, it’s important to avoid foods and drinks that can stain teeth, such as coffee, tea, or red wine. This helps maintain the results for a longer period.

Regular Dental Check-ups

Regular dental check-ups allow the dentist to monitor your progress and ensure that the cosmetic treatments are working as expected. Routine visits can help prevent issues that could delay the results, such as infections or misalignments.

Following Dentist’s Instructions

Every cosmetic dental procedure has specific aftercare instructions. Following these instructions carefully can help reduce healing time and ensure the best possible outcome.

Conclusion

The time it takes to see results from cosmetic dentistry varies depending on the procedure and individual factors. Simple treatments like teeth whitening and bonding offer immediate results, while procedures like dental implants and Invisalign require more time to show the full effect.

Understanding the timeline for each procedure and following your dentist’s instructions can help you achieve the desired results in the shortest time possible. Be patient and give your body the time it needs to heal properly for the best and most lasting results.

Design a site like this with WordPress.com
Get started